

DIY Epoxy River Table: Step-by-Step Guide
Nature-Inspired Art, Made by Hand
Epoxy river tables have become a standout trend in modern interior design, celebrated for their stunning fusion of natural wood grain with transparent or colored resin. These tables offer both aesthetic beauty and practical function, making them a popular choice for dining rooms, living spaces, and office environments.
Compared to traditional furniture, a DIY epoxy river table allows for much more personal expression. Each piece is entirely unique. Making your own table can reduce the cost of custom furniture and also provide a strong sense of achievement.
This article will guide you through the complete process. From choosing the right materials to pouring resin and achieving a polished finish, you'll learn everything needed to successfully create your first epoxy river table.

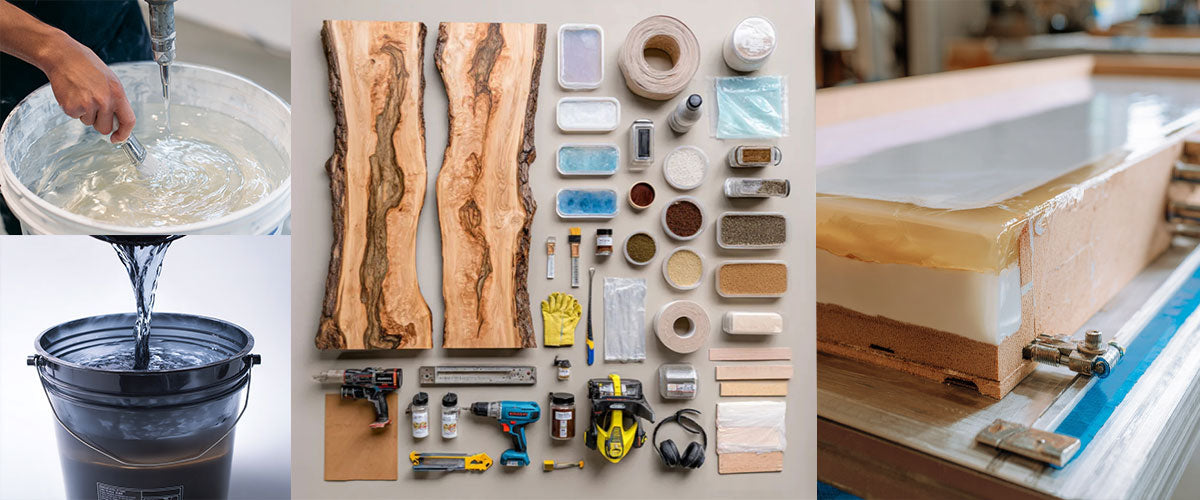
2. Preparation Stage: Materials and Tools Checklist
Before starting your DIY epoxy river table project, it’s essential to gather all the necessary materials, tools, and safety gear. Proper preparation ensures a smoother workflow and a higher-quality final result.

Main Materials
Kiln-Dried Hardwood Slabs
Choose stable, fully dried wood such as black walnut, oak, maple, or elm. The slab size should match your intended table dimensions. Avoid wood with high moisture content to prevent warping or bubbling during the resin curing process.
Epoxy Resin and Hardener
Use high-quality furniture-grade epoxy designed for casting or coating. Clear resin is standard, but pigmented options are available depending on your desired aesthetic. Make sure to follow the manufacturer’s recommended mixing ratio.
Pigments and Metallic Powders
Add oil-based dyes, mica powder, or metallic pigments to the resin to create color variations, swirls, or river-like effects.
Mold Materials
Prepare mold walls using PVC boards, MDF panels, or HDPE (high-density polyethylene). Reinforce edges with screws or clamps to withstand resin pressure. Use tape or a non-stick coating to line the mold for easy release.
Sealants and Adhesives
Use silicone caulk or hot glue to seal all seams and edges of the mold. This prevents resin leakage during the pouring process.
Essential Tools
Cutting and Shaping Tools
Circular saw, table saw, or jigsaw for cutting slabs. A router or planer helps flatten uneven surfaces and refine edges.
Measuring and Layout Tools
Tape measure, square ruler, pencils, and level to mark dimensions and ensure proper alignment.
Mixing Tools
Sturdy plastic containers, wooden or silicone stir sticks, and a low-speed drill mixer for blending epoxy and pigments thoroughly.
Bubble Removal Tools
A heat gun or propane torch is used to eliminate surface bubbles after pouring. A vacuum chamber is recommended for professional-grade bubble removal before pouring.
Sanding and Polishing Equipment
Sandpaper ranging from 100 to 1200 grit for surface smoothing. An orbital sander or belt sander is ideal for efficient sanding. Use a polishing machine with a wool pad and polishing compound to achieve a glass-like finish.
Safety Equipment
Personal Protective Gear
Wear chemical-resistant gloves, safety goggles, a respirator mask, and a protective apron to prevent contact with resin and fumes.
Ventilation Setup
Always work in a well-ventilated area. Use fans or an exhaust system if working indoors. Proper airflow is critical to reduce inhalation of potentially harmful vapors.
For more information,please refer to The Ultimate Guide to Crafting an Epoxy Live Edge Table.
3. Step-by-Step Guide to Making an Epoxy River Table
This section outlines the complete process of crafting your own epoxy river table, from preparing the wood to finishing the final product. Each step plays a crucial role in ensuring structural integrity, visual appeal, and long-term durability.
1. Preparing and Treating the Wood
Select hardwood slabs that are fully dried and free of cracks or rot. Ideal moisture content should be below 10 percent. Use a moisture meter to verify dryness.
Cut the wood to your desired dimensions, preserving the natural live edge for a more organic look.
Sand the surfaces lightly to remove rough areas. Fill any knots, cracks, or holes with epoxy to avoid air pockets or leaks during casting.
Make sure both slabs are level and stable, as uneven wood will affect resin distribution.
2. Building the Mold and Securing the Slabs
Construct the mold using MDF, HDPE, or PVC boards. The mold should be slightly larger than the final tabletop dimensions to allow for trimming.
Line the inside of the mold with non-stick tape or apply a mold release agent to prevent the resin from bonding to the mold walls.
Seal all edges and seams of the mold using silicone caulk or hot glue to prevent resin leakage.
Place the wood slabs into the mold and position them carefully to create the desired river channel between them. Use clamps or weights to hold them in place and ensure they remain centered.
3. Mixing the Epoxy Resin
Measure the epoxy resin and hardener precisely, following the manufacturer’s recommended ratio. Accuracy is critical to ensure proper curing.
Mix the components slowly with a low-speed drill mixer or stir stick for 4 to 5 minutes. Scrape the sides and bottom of the container frequently to avoid unmixed pockets.
Add pigments, mica powder, or dyes as desired to achieve the color and visual effects you want. Mix thoroughly.
Let the resin sit for about 10 to 15 minutes to allow bubbles to rise. If available, use a vacuum chamber to remove air bubbles more effectively.
4. Pouring the Epoxy Resin
Pour the resin into the mold slowly and evenly, starting from one end and allowing it to flow into the river channel and any gaps between the wood.
For thicker pours, work in layers of no more than 1/4 inch each. Most projects require 2 to 4 pours to achieve the desired depth and clarity.
After each pour, use a heat gun or propane torch to remove surface bubbles. Move the heat source in sweeping motions to avoid burning the resin.
Once pouring is complete, cover the mold with a dust cloth or plastic sheet. Let it cure at room temperature (68 to 77°F or 20 to 25°C) for at least 24 to 72 hours depending on the resin used.
5. Demolding and Initial Cleanup
After the resin has fully cured, gently remove the mold. Use a rubber mallet or wooden wedge to assist if needed, being careful not to damage the edges.
Trim off any excess resin around the edges using a saw or router.
Remove any remaining mold tape, sealant, or rough spots around the borders. An angle grinder or utility knife can be used for detailed cleanup.
6. Sanding and Polishing
Begin sanding with 100-grit sandpaper and work your way up through finer grits in this sequence: 100 → 150 → 180 → 240 → 320 → 600 → 800 → 1200.
Use an orbital sander for best results. Always sand evenly and consistently to eliminate surface imperfections and level the entire surface.
After sanding, polish the resin surface with a wool polishing pad and polishing compound. This step enhances the clarity, smoothness, and mirror-like finish of the tabletop.
7. Attaching the Table Legs (Optional)
Choose table legs that complement the aesthetic of your finished top. Options include black powder-coated steel, stainless steel, or hardwood legs.
Measure and mark leg positions on the underside of the tabletop. Pre-drill holes to avoid splitting the wood.
Use screws or bolts to securely attach the legs. Adjust them to ensure the table stands level and does not wobble.
By carefully following each of these steps, you’ll create a finished epoxy river table that is not only beautiful and functional but also long-lasting. With patience, precision, and the right tools, your DIY project will result in a one-of-a-kind masterpiece that reflects your craftsmanship and creativity.
For a more detailed look at our dedicated factory process, please refer to The Ultimate Guide to Crafting an Epoxy Live Edge Table.
4. Tips and Important Considerations for Epoxy River Table Making
Ensure Wood Is Fully Dry
It is critical to use wood with a moisture content below 10 percent. Moisture trapped inside the wood can cause bubbles or discoloration during resin curing. Using a moisture meter to verify dryness before starting is highly recommended.
Accurate Resin-to-Hardener Ratio
Always measure the epoxy resin and hardener precisely according to the manufacturer’s instructions. An incorrect ratio—especially an excess of hardener—can result in sticky surfaces or incomplete curing, compromising the table’s durability and finish.
Pour Slowly and Steadily
When pouring resin, maintain a slow and consistent flow to minimize the introduction of large air bubbles into the river section. Rapid pouring increases the risk of trapped bubbles, which can mar the final appearance.
Follow Proper Sanding Grit Progression
Skipping grit levels during sanding may leave scratches or uneven surfaces that are difficult to polish out. Adhering to a sequential sanding progression—from coarse to ultra-fine grit—is essential to achieve a flawless mirror-like finish.
Use Personal Protective Equipment (PPE)
Wear chemical-resistant gloves, safety goggles, and a respirator mask throughout the process to protect against harmful fumes and skin contact. Work in a well-ventilated area to reduce inhalation risks.
Choose Optimal Working Times and Environment
Perform resin mixing and pouring during cooler parts of the day, such as early morning or late evening, to prevent accelerated curing or defects caused by high temperatures. Avoid working in direct sunlight or excessively humid environments to maintain resin clarity and cure quality.
By following these best practices, you can greatly improve the quality and longevity of your epoxy river table while ensuring a safer and more enjoyable crafting experience.
5. Finished Product Showcase and User Experience
The completed epoxy river table perfectly blends natural wood grain textures with modern artistic elements. Whether it’s the striking combination of rich wood patterns with metallic powders or the translucent deep blue resin that mimics flowing water, every table stands as a unique visual masterpiece.
More than just a dining or office table, it is a tactile piece of functional art. The durable resin surface resists wear and is easy to clean, making it suitable for a wide range of interior design styles—from minimalist and Scandinavian to contemporary and rustic.
Here are some inspiring design ideas to consider:
Olive wood paired with smoky gray resin for an elegant and understated natural beauty.

Walnut combined with a ‘wave’ pattern design to create a sense of movement and depth.

Black walnut integrated with built-in LED lighting to craft a modern and artistic ambiance.

6. Conclusion: Crafting Life into Wood
Walnut paired with a ‘starry galaxy’ resin effect for a cosmic and captivating look.
Creating your own epoxy river table is much more than a woodworking project. It is a journey where nature and artistry converge. From rough raw slabs to a flawless mirror-finish masterpiece, every stage reflects the care, creativity, and dedication of the maker.
If you appreciate hands-on craftsmanship and have a passion for natural beauty, we encourage you to try this rewarding DIY project. Beyond gaining a personalized, functional piece of furniture, you will also experience a unique sense of fulfillment and creative healing along the way.
Hot-Selling Product


Original price
$1,074.00
Original price
$1,074.00
-
Original price
$1,074.00
Original price
$1,074.00
Current price
$859.00
$859.00
-
$859.00
Current price
$859.00
Handcrafted Black Walnut Live Edge Epoxy River Dining Table - A53
WorldcustomtableHandcrafted in a generous, oversized format, this Black Walnut epoxy river table features smoke gray resin flowing alongside rich natural walnut gr...
View full details

Original price
$816.00
Original price
$816.00
-
Original price
$816.00
Original price
$816.00
Current price
$653.00
$653.00
-
$653.00
Current price
$653.00
Custom Black Walnut Waterfall Epoxy Console Table Handmade Entryway Table - P70
WorldcustomtableAdd a striking statement to any entryway with a black walnut waterfall epoxy console table, featuring a clear resin top that flows seamlessly over ...
View full details

Original price
$2,626.00
Original price
$2,626.00
-
Original price
$2,626.00
Original price
$2,626.00
Current price
$1,967.00
$1,967.00
-
$1,967.00
Current price
$1,967.00
Handmade Executive Boardroom Table - Extra Large Black Walnut Epoxy Conference Table - P57
WorldcustomtableThis extra-large black walnut epoxy conference table is more than table. It’s a statement of leadership, craftsmanship, and vision. Designed for ex...
View full details

Original price
$1,074.00
Original price
$1,074.00
-
Original price
$1,074.00
Original price
$1,074.00
Current price
$859.00
$859.00
-
$859.00
Current price
$859.00
Oval Walnut Epoxy Dining Table – Stylish Centerpiece for Dining & Living Spaces - P04
WorldcustomtableHandcrafted oval walnut epoxy dining table with white resin inlay. Durable and stylish, perfect for dining rooms or living spaces in California, ea...
View full details

Original price
$1,074.00
Original price
$1,074.00
-
Original price
$1,074.00
Original price
$1,074.00
Current price
$859.00
$859.00
-
$859.00
Current price
$859.00
Ocean-style Black Walnut Epoxy River Table for Dining & Living Room - A28
WorldcustomtableTransform your space with this black walnut epoxy river table, featuring premium walnut wood and deep blue resin. Artisan-crafted, it brings coast...
View full details
Leave a comment